Stay Connected

Photobucket Photobucket Photobucket

Friends

Grab A Button

Photobucket

Search This Blog

Blog Lovin'

Easy Blog Tips!
TCBOTB
Powered by Blogger.

Tuesday, January 31, 2012

Blooming Box

Today's project is a continuation of the pallet art I did last week.  I actually had 2 pallets and only used one for the project so I had a great idea to make a flower box.  I never really loved what I had for under the TV

And for a long time I have been thinking of doing flowers under the TV, I was just having a hard time finding the perfect container for the flowes.  I though of using a make travel trunk but they werent long enough, then I thought of using glass but that really wasnt the look I was going for and then the pallet art.  You can see the full article here.  Once the art was done I asked Joe my handy man husband to make me a flower box.  I wasnt thinking anything fancy, just four sides and a bottom but he decided to make it cute and give it an angle.  Now you have the back story, below is the finished project.  Ok to be honest, I have done MUCH more primping to this since I took this picture because lets be honest the green things are a little CRAZY but i was just so excited I had to share it with you!

Here is what you are going to need for this project:
  • Wood (cut to your specifications, mine was 4" tall by 20" long)
  • nails/hammer
  • saw that can cut angles if you want the fancy box, otherwise just a regular saw
  • paint, if you want
  • flowers $30
  • flower foam $5
Total cost for this project was $35 and that was just flowers and the flower foam, all the other items I had at the house!  How awesome, since this would cost over $100 at the store!!


First step is to cut the wood to your measurements.  Make sure you also cut a piece to fit into the bottom so you dont have the foam fall out if you pick up the box.  You can kinda see the angles here, but Joe actually had to redo this because the angles werent quite right, so not to preach to the choir or anything but measure twice, cut once.  Luckly we had plenty of wood to work with so no harm no foul.


Then nail all the pieces together.  I would nail the long pieces to the bottom piece first then close it off with the two smaller side pieces, but whatever you feel more comfortable with do that.  If you like the look of the wood and dont want to paint then skip this step, but if you want to whitewash your wood follow me to the next step :)

For this step you need your box, paint, water and a paint brush.  This is probably not the correct way to white wash but I like the way it turns out so this is the right way for us.  I had a gallon of white paint with about 1/4 left.  To get it the thin, whitw wash consistancy, we filled up the gallon with water about 3/4 full and then mixed the paint with the water. 


Now all you have to do is apply the paint to your project.  Easy peasy!  Let that sit overnight to make sure you dont get paint on anything then you can move on to the next step...adding the flowes!  Before you get started on the flowers, add the foam

Joe cut mine down a little so it fit perfectly in the box, if you did just a square box then you probably wont have to do this but with the angled box it does help to cut it do you have a perfect fit and it doesnt move around in the box. Once the foam is in start adding the flowers.  I bought bunches of blowers so I actually had to cut mine apart first into individual stems so if you bought bunches great, you probably saved money you just have to add one extra step.


 I added all my big flowers first then filled in the spaces with my smaller yellow fillers.
So what do you think, pretty easy right?!  Oh and I added a butterfly, because they are cute and I can so there!

I think it looks so much better than what I had before and it was pretty cheap too!  What do you think, is there somewhere you could put a cute little flower box?


**Update** I decided that I needed to show you the primped version of the box since the longer I look at the above picture the more I realize it doesnt do the box justice**

Much better right!
Project Housewife Out! 

Im Linking Up!  Come check me out at A Bowl Full of Lemons, Tip Junkie, Lil Pink Pocket, My Girlish Whims, Southern Lovely, Beyond the Picket Fence, House of Hepworths, Bacon Time, Addicted2Decorating, 6 Sister's Stuff

 Tip Junkie handmade projects  Beyond The Picket Fence  HookingupwithHoH   


Monday, January 30, 2012

I DID IT!

Happy Monday everyone!!  Today's post isnt really a project I can teach you (yet) but its a project I have been working on for a while.  I dont know when it started but it seems that the crochet trend is back by popular demand.  I love crocet hats and scarves and decided I wanted to learn as well.  I bought some supplies and had my mom and Geri teach me the basic single stitch.

This is what I started with but Geri quickly told me to get started I needed a bright color yarn and a thicker guage so that it is easier to see what you are doing.


So after getting super frustrated with this teal piece, I moved on to bright yellow and a pretty thick yard.  Mom and Geri helped me for a while but then I went home and was on my own.  I thought I was doing pretty well, set my work down and realized I was not.  I was doing something wrong on the turn but didnt know how to fix it.  So I set it down and picked it back up the next day, tried a different tecnique and that seemed to work so I finished my ball of yarn and was just happy to have a finished product.


I realize its not much of anything really but I was happy to have something to show for all the work I did.  I am great at the single stitch now but still need to work on the turn.  My next attempt will be with the teal yarn and with the double stitch...stay tuned to see how that adventure turns out.  One day I will have a pretty hat to show you but it seems like that day is a little further off than I thought.

I did want to share a really great website with you, Lion Brand Yarn has a great website with videos and print outs, free patterns and of course yarn and supplies.  I love that this company has all these free resources to show you how to crocet.  I watched the video to figure out the beginning slip knot but needed someone to actually sit with me and show me the chain, Im really not a great visual learner but I caught on eventually.  If you are interested in learning how to crochet go check out Lion Brand Yarn, see their resources and buy some of their yarn (I really like martha stewart styles) and get started. 

I did realize though that this may be a hard project for me, my joints get really stiff when I do this and that may just be because I am just learning and my fingers are a little too tense but I have to take frequent breaks to let my hands rest.  So just be patient and keep with it dont give up keep plugging along.  I cant wait to share more crochet adventrues with you!

Any of you out there crochet?  I would love to hear some tips you have or your favorite pattern, share with us!

Project Housewife Out!

Friday, January 27, 2012

Foodie Friday

Well today is a great Friday for me!  Number 1 its foodie friday and I always love sharing recipes with you!!  Number 2 I put my 2 weeks notice in at my job today to start a new career path with a new hotel.  I am extremely excited about starting a new job and what fun surprises it will hold.  Its also a beautiful day outside and I have a weekend filled with nothing coming up so I am just an all around happy camper! 

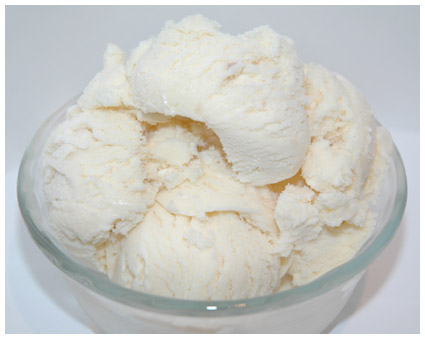
On to the recipe today...because I am in such a good mood I think I am going to share with you my family's icecream recipe.  Nothing fancy or anything but its a family recipe so Im happy to share it with you.  This actually comes from my Grandpa who would make the eggnog variation each year for Christmas.  I loved it and love to make it around Christmas time.  I have a cuisinart ice cream maker that I love and recommend you get one too!  I wish I had gotten a colored one but mine is just silver.  So here is the recipe

Paul’s Famous Homemade Ice-cream


(Paul McCormack recipe)

Servings: 4-5 quarts   Prep Time: 15min   Freeze Time: per ice-cream maker   Difficulty: Easy

Ingredients

• 2c sugar

• 4 large eggs

• 1 can Eagle Brand condensed milk

• 1quart heavy cream (not whipping cream)

• 1tsp vanilla (can be substituted for any flavor)

• Enough whole Milk to fill Ice Cream maker (can be substituted with egg nog)

Instructions

Put sugar in a large mixing bowl. Make a volcano top in the sugar and add eggs. Beat eggs until blended and continue to work in the sugar. With mixer running, add condensed milk slowly until fully blended. Add vanilla any time. Add heavy cream as you continue to mix until thoroughly blended. Pour mixture into freezer and add whole milk as required. Stir to blend before closing freezer.

Yum Yum!  I have been craving icecream all week, I think I am going to make some this weekend!  What awesome recipes do you plan to make this weekend?

Project Housewife Out!


Im Linking Up!  Come visit me at Add A Pinch, A Bowl Full of Lemons, Made Famous By
add a pinch.com  Blog

Thursday, January 26, 2012

Thankful Thursday

Another week has gone by and I find myself writing another Thankful Thursday post.  Today is another silly thing to be thankful for but come November it wont be so silly then!  When I have the most awesome amazing house on the block!!!  What am I talking about you ask?!  Well Christmas Lights of course!!

So what I am actually thankful for is Christmas clearance sales because I got all of the above Christmas lights, plus 5 more boxes of lights, 2 rolls of white rope light, 15 boxes of christmas ornaments and 5 boxes of white christmas tree path lights all at 50-70% off!  I love how much money I save on Christmas lights bevcause I dont know if you can tell or not but I am only buying LED lights which most of you probably know is the most expensive way to go.  But on the flip side I save about $30 (so far) in electricity over the regular blubs.  I bet I actually save more because I had a lot more lights up this year than I did last year so $30 is a low number but makes me happy because I can have a lot of lights up without having a huge electrical bill.

These arent the best pictures but you can see the lights we had up this past year.  After I took this picture I added lights around the base of the two trees and lights around a shrub you cant see right now because its dark.


We are getting rid of those ugly icicle lights, I dont know why I just hate them and they look stupid in those trees anyways.

So thats what Im thankful for this Thursday.  A little bit of silliness but hey we all know by now that I have a deep seated love of Christmas and Christmas lights and they make me happy (although seeing them in January does not make me happy, neighbors I talking to you who still have your darn icicle lights still up).

What makes you happy or thankful on this Thursday?  Im sure its something a little more interesting than Christmas lights but they were just on my mind today I cant help it! :)

Project Housewife Out!

Wednesday, January 25, 2012

Warm and Fuzzy

Today is a really rainy day and on rainy days I always wish I was at home on the couch drinking hot chocoalte and watching a good movie with my puppy dog...you know my puppy dog...so cute...anyway stop being side tracked! 
So on this rainy day, for some odd reason, I am thinking of laundry.  I dont have a pile sitting at home waiting for me but I think Im thinking of the awesomeness that is hot towels fresh out of the dryer.  Anyway I wanted to share my quick and easy laundry room transformation with you.  I dont have a before shot because we did this before I decided to start a blog but you can see below the finished product.

So really this was pretty easy.  I got a sets of double door cabinets from Lowe's on clearance (these were the 2010 model, look the same as the 2011 but who am I to complain) for $75 a piece.  They are already stained and ready to hang so that made me a happy camper.  The knob pulls were $2 a piece, I wanted really big ones with the stainless steel look and these were perfect and fit the bill at $2 a pop.  I wanted to get a long cabinet for the side you can kinda see there to put my brooms and mops in but if they didnt have any that were long, all the long ones they had were sectioned off and that wasnt what I was looking for, so the search continues for that.

Ok on to hanging these bad boys.  My husband is a real trooper, I didnt help him at all with hanging these and he got them up there all on his own so I have to give him real props for that because these suckers were HEAVY.  What you need is a 2x4, screws and a drill.  Measure the 2x4 to the length of your first cabinet.  Ours were 30inches long.  Cut your wood to fit right on the back of the cabinet, you may need to cut it 1inch shorter depending on the back of your cabinet.  Measure on the wall where you want the cabinet to hang, mark you spot and then screw the 2x4 to the wall.  Let me emphasize that you need to measure, measure one more time and then just to be sure measure again.  Once you get the board in you really cant make any adjustments so make sure you have the board exactly where you want it.  Make sure you use heavy duty screws so they dont break or anything.  Once the board is on the wall (make sure its super secure pull on it, do whatever you need to do to make sure its on there good and tight) then go on and hang your cabinet on the board.  You would think it was more complicated than that but its not.  Its heavy as heck though so be prepared for that!

Now that they are hung be happy because you have storage in your laundry room!  I hate seeing the clutter so this made me happy because before we had that crappy wire rack and you can see all your supplies out there.  With the cabinet its nice and stored away where no one can see it!  Yay!  And to spruce the room up I added a flower strand I found at Garden Ridge for $2!  Pretty awesome right!

So this isnt the cheapest project Ive done (cabinet $75x2, cabinet pulls $2x4, flower chain $2x2 total cost $162) but it looks nice, added more storage to the laundry room and makes me happy and its my house so thats all that matter right?!  I thought so too :)  What additions have you made to your laundry room to make it a space you like?

Project Housewife Out!

Tuesday, January 24, 2012

Pallet of Colors

I have a confession...I may be slightly addicted to pinterest.  Im sure most of you are too, its a sickness that makes me want to spend all my money on cute ideas.  While I was trolling pinterest, I saw this really cool looking headboard


So cool right!  Well I already have an awesome headboard (which you can see here) but I need some cool wall art for on either side of my TV and I thought this was simple enough to do the trick without overpowering the TV.  Now let me should you my before shot

No bad, but not good enough for me.  So now I can show you the project!!  I got the inspiration to use pallets from here.  But I wasnt crazy about the flowers I thought that might be too busy for the TV area so it was a blend of ideas to creat my final project, which see below for the after!!


Yes I am about to watch Once Upon a Time, and why arent you its an awesome show!
I think it brings a lot more color to the roon and is just a little cooler to look at...what do you think?

Ok on to how to make this baby...first you need a pallet.  My husband works for a plumbing supplier and they have loads of pallets so that was totally free yay!  So before I get down to the nitty gritty...here is what you are going to need
  • 1 pallett---all of the pieces (free)
  • paint of your choice, varying shades (free)
  • crobar (free)
  • saw (free)
  • nail/hammer (free)
  • painters tape/paint brush ($5)
  • pencil/ruler (free)
  • screw/wire (for hanging) (free)
Total cost for this project...$5!!!  What, thats amazing!!
Looks kinda ugly right?  Well dont worry we are painting it so no worries.  Now you have to get the boards off, and if you have a cro-bar that would be best. Joe had to use a hammer and that was pretty hard so if you have a crobar make it easy on yourself.  Below are the boards cut down to the measurements I gave Joe.  I wanted the project to be 15wide by 30 long, so I plank from the pallet was long enough for 2 strips.  You can also see from the picture here that we used the pallet support beams as cross beams for the art. 
Here it is all put together ready for paint.

I first thought to whitewash it (I hadnt decided if I wanted to do the color blocks or the flowers yet) and that turned out pretty well, and I think also helped with the paint.  It was kinda like primer but didnt bring up all the pulp that comes out of the wood when you use regular primer (more to come on whitewashing later)

I let these sit overnight to make sure the paint had set.  The next day I started taping out the lines for the stripes.  I wanted each pallett art to be different so I measured the stripes at different heights.

I used a paint stirrer as my guide and a pencil to do the initial lines then went back and put painters tape over the lines.  Remember that where you put the tape you cant paint otherwise you will have gaps between the stripes so be mindful of that when you put the tape down.  You can see below what I did to make sure I kept that straight.

Now you have your painters tape down get to painting.  I had plenty of leftover paint from the walls and color samples so that was free too!

Let that sit overnight so that when you put the second layer of painters tape down it doesnt pull off you paint you just did.  Once it has dried and you get your second tape down, paint again.

Wait for the paint to dry and remove the tape.  Now if you are like me you will have to do some touch ups, but if you have one of those sponge paint brushed that has a stright edge this is pretty easy.  Once its dry, you can screw your screws and wire into the back of the boards and hang them up!  Make sure you use an anchor when hanging these babies are pretty heavy!

Pretty easy, pretty cheap and pretty fun too!  I feel like an artist enough though I cant draw to save my life!  DO you have a space that this art would be perfect for?  Let me know, and what do you think of this art?  Should I leave it or do the flowers pallet art?  I think I need a second opinion

Project Housewife Out!


Beyond The Picket Fence         
IHeart Organizing


HookingupwithHoH