

Stay Connected

Photobucket Photobucket Photobucket

Friends

Grab A Button

Photobucket

Search This Blog

Blog Lovin'

Easy Blog Tips!
TCBOTB
Powered by Blogger.
Showing posts with label bake at 350. Show all posts

Friday, April 13, 2012

Foodie Friday #21

Let me tell you...I am sooo excited to share this recipe with you today!  I have been working on it for about a month now and I think I have it to where I like it.  Im also super excited to share with you what came in the mail yesterday...


Can you guess what today's recipe is going to be yet?  No...well here is another hint.  I made my own vanilla sugar, check it out...


I had to label it otherwise my husband would use it for his coffee and thats not cool!  This container holds a little less than a small bag of sugar.  When I first put the vanilla beans in there you could smell it but it hadnt really penetrated the sugar yet.  Now its been in there for a little over a month and when you open it you are hit in the face with vanilla sugar goodness.  I didnt cut the beans open or anything, I just stuck them in there and wow its awesome how great it smells!

I also bought some silicone baking mats and they make a WORLD of difference.  Recently I bought some new cookie sheets that would fit better side by side in my oven, but they were darker than my old cookie sheets so they kept getting dark on the bottoms too quickly.  This mat not only solved that problems but gives me the perfect light gold color cookie.  It was $10 for each mat, but the amazingness that it provides makes it well worth it.


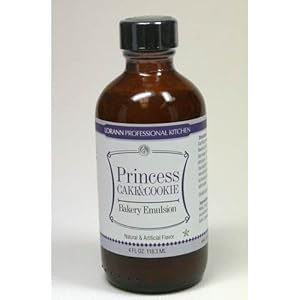
The last awesome baking item I want to share with you is LorAnn baking emulsions.  I have 4 of them now (Red Velvet, Buttery Vanilla, Sweet Dough, and Princess) and the latest one, Princess, I think is going to be my all time favorite.  Its basically a combination of butter, vanilla, almond, and lemon...all flavors that I have used to try and get the perfect flavor...but now I dont need to experiment, I have the ultimate flavoring!  A word of warning though...these babies are really hard to find.  I got my Red Velvet flavoring from Marshalls Home Goods, but the other 3 I had to buy on amazon.com so if you find them in a local store scoop them up!

So I bet you know by now what we are going to make today...The perfect Sugar Cookie!!  I have gone through many different sugar cookie recipes in my day, but the basic recipe from Bake at 350 is my ultimate favorite.  The best part about it is the fact you dont have to refrigerate it for 1 hour, I hate waiting.  Her royal icing is also my all time favorite.  So here it is, my absolute favorite cut-out sugar cookie and royal icing recipes, see notes at the bottom.

Vanilla Sugar Cookies
(A Bake at 350 blog recipe, modified by Project Housewife)

(dont judge me on the icing, I didnt get my cookie decorating kit until yesterday and these were for Easter)


Servings: 3dozen     Prep Time: 15min      Cook Time: 10min       Difficulty: Easy

Ingredients

  • 3 c unbleached, all-purpose flour
  • 2 tsp baking powder
  • 1 c sugar (I use sugar that I've stored vanilla beans in)
  •  2 sticks (salted) butter*, cold & cut into chunks
  •  1 egg
  •  3/4 tsp pure vanilla extract or 2tsp vanilla bean paste (I prefer the paste it has a richer taste to it)
  • 1/2 tsp extract of your choice, I've used almond, Princess, Buttery Vanilla, and a mix of almond and lemon...Princess is my favorite followed by lemon.
Instructions
Preheat oven to 350.


Combine the flour and baking powder, set aside. Cream the sugar and butter. Add the egg and extracts and mix. Gradually add the flour mixture and beat just until combined, scraping down the bowl, especially the bottom.


The dough will be crumbly, so knead it together with your hands as you scoop it out of the bowl for rolling.


Roll onto a floured surface and cut into shapes. Place on parchment lined baking sheets and bake for 10-12 minutes. Let sit a few minutes on the sheet, then transfer to a cooling rack.


*salted butter is a must here, but if you dont have salted butter add about 1/4 tsp of salt to the mix.  I have found that not having that salt will leave a bit of an after taste and no one likes that!

Royal Icing
Servings: about 4 cups    Prep Time: 10min        Cook Time: 0min       Difficulty: Easy


Ingredients
  • 4 TBSP meringue powder
  • scant 1/2 c. water
  • 1 lb. powdered sugar
  • 1/2 - 1 tsp light corn syrup 
  • few drops clear extract (optional*)
Instructions


Combine the meringue powder and water. With the paddle attachment of an electric mixer, beat until combined and foamy.

Sift in the powdered sugar and beat on low to combine. Truth be told the first time I did sift but the the second time I didnt and I really didnt see much of a difference, so try it and see what works best for you.

Add in the corn syrup and extract if desired*. 

Increase speed to med-high/high and beat for about 5 minutes, just until the icing is glossy and stiff peaks form.  (You should be able to remove the beater from the mixer and hold up and jiggle without the peak falling.) Do not overbeat.

This "stiff" icing is perfect for outlining and even for building gingerbread houses and monogramming. To fill in your cookies, add water to your icing a teaspoon at a time, stirring with a rubber spatula, until it is the consistency of syrup. This technique of filling a cookie with thinned icing is called "flooding."


Cover with plastic wrap touching the icing or divide and color using gel paste food colorings.


*I always add the extract to the icing I love the extra kick of flavor...I have tried almond and wasnt crazy about that, lemon was great, butter vanilla was great and I actually have added a dash of cinnamon and that was surprisingly interesting.  Im still perfecting the flavor of the icing but thats just what makes a basic royal icing fun!


I want to encourage all of you to go to Bake at 350 and read her Royal Icing 101.  Anytime I dont know what Im doing with cookies I go straight to her blog and see what she's got for info.  Also, the Royal Icing 101 has pictures and tips that Im not going to share here because, well they are her's and while Im sharing the recipe here I cant at all take credit for her tips that she has compiled over dozens and dozens of cookie making session.  So if you want to learn some great cookie stuff, go check Bridget out at Bake at 350 (all Bake at 350's are links back to the site in case the links dont stand out)


What do you think???  Going to run home and make these cookies??  Are you going to follow Bake at 350 (because really you should, I love this girl, she comes up with some amazing stuff!)??  Are you just going to droll over these cookies and ask me to make some for you (because really Im fine with that I love making these cookies)??  Whatever you decide thats cool with me!


Project Housewife Out!


Im Linking Up!  Come check me out at Tidy Mom, Bacon Time, Hope in Every Season, Petals to Picots, Addicted 2 Decorating, Six Sisters Stuff, Alderberry Hill, Add a PinchPositively Splendid, Blissful & Domestic, Flour me with Love, Tip Junkie, Crazy for Crust, A Bowl Full of Lemons, Not Just a Housewife, Romance on a Dime, Ginger Snap Crafts, Southern Lovely, My Girlish Whims, Lil Pink Pocket, DIY by Design, Michelle's Tasty Creations, Beyond the Picket fence, Made Famous By

Tuesday, February 28, 2012

Pin-Stration

Going off of yesterday's pinterest post...we all have like a million pins on pinterest but dont end up doing hardly any of them.  I decided that Im going to share with you some of the things Ive made that have been inspired by something I pinned on pinterest.  The first pin-stration (pin inspiration...you get it right lol) I want to share with you is something I was actually a little reluctant to pin in the first place. 

Let me explain...while I have an awesome dog named Oreo, Im really not a huge fan of the cookie itself.  I know Im weird, but another shocker is Im not really a huge fan of chocolate in general.  So it was with a little reluctance that I pinned "Birthday Oreo Stuffed Brownies".  Main reason I pinned these is because...Birthday Cake Oreos?!?  That sounds awesome actually, and the other reason...its from Bake at 350 blog and I love that girl and her awesome blog.  Love of Harry Potter aside she has some great desserts over there, so go check her out.  On to the pin...

Like I said its Birthday Oreo Stuffed Brownies but I have a confession, I love to take short cuts when it comes to brownies.  As I said I dont love chocolate so I dont love making that from scratch, plus a brownie mix box is only like $2 so why bother!  Of course Bridget has an awesome brownie recipe that Im sure is awesome and if you love chocolate should try it. Here is the recipe so you can see for yourself...oh and a link to the actual post so you can see all her awesome pictures.

Birthday Cake Oreo-Stuffed Brownies
{from bakeat350.blogspot.com}

1 cup dutch-process cocoa (such as Hershey's Dark)
1 tsp. coarse salt
1/2 tsp. baking powder
3/4 c. unsalted butter
2 cups sugar
1 TBSP vanilla
3 eggs, lightly beaten with a fork
1 cup unbleached, all-purpose flour
20 Birthday Cake Oreos (or regular Oreos)
1 tsp. corn syrup
1 tsp. water
sprinkles

Preheat oven to 325.  Grease a 9x13" baking pan.  

In a medium bowl, whisk together the cocoa powder, salt, and baking powder.  Set aside.

In a medium saucepan, heat the butter over medium-low, until melted.  Add the sugar and stir to combine.  Continue heating about 1-2 minutes, until hot.  

Remove the pan from the heat and add the cocoa mixture, stirring until combined.  Add the eggs and vanilla; stir until totally combined.

Add the flour and stir again until smooth.  

Spread half of the batter into the prepared pan.  Top with 20 Oreos.  Cover with the remaining batter; spread gently with an offset spatula.

Bake for about 30 minutes, until the brownies are done, but the center still looks soft.

{The Oreos will make the brownies a little bumpy....that's ok.}

Set the pan on a wire cooling rack and let cool 10 minutes.  Meanwhile, stir together the corn syrup and water.

After 10 minutes, lightly brush the corn syrup mixture onto the cooled brownies.  Scatter on the sprinkles.  (Adding them before baking will cause the sprinkles to discolor and become misshapen.)

Let the brownies cool completely before cutting.  (A bench scraper is the perfect tool for cutting brownies.)


For the brownie mix from a box the 9x13 baking dish, in my opinion was a little too big so if you have one size smaller you should use that.  Check out the "awesomeness" that is my brownies.

 So you can see by awesome I dont mean pretty, the awesome really refers to the tastyness.  Dont judge a book by its cover right!  See there isnt enough brownie mix to cover all the tops of the Oreos so thats why I say use the smaller pan so you can make them a little thicker.


You cant see the Oreo until you bite into it but trust me its there and its tasty.  I know its not the best picture, but I wasnt planning on doing this post then last minute (ok today) decided I put this up here.


Get out there and try it...or just try something from your Pinterest boards, Im sure we all have a lot to choose from (easiest to try is food...just sayin!).


Project Housewife Out!

Monday, January 9, 2012

Just Another Manic Monday

Happy Monday everyone!  Its raining here and hopefully bringing some cold weather with it, but I wont get my hopes up.  I know its Monday and not Friday but I am dying to share 2 recipes with you.  The first recipe comes from bakingdom.com and I LOVE this blog...mainly because she has some awesome Harry Potter-esk recipes which Im going to link to today.  This is the amazing BUTTERBEER!!  Thats right BUTTERBEER!!!!!  I have been to the Wizarding World of Harry Potter twice and always drink way too much of the butterbeer because I know I cant have it any other time.  They make 2 kinds for those of you who dont already know, a slushee version and a soda version.  Some people prefer the slushee version because it isnt as sweet but I dont really like it, it just doesnt taste right to me.

I love butterbeer :)  Anyway, on to the recope.  Here is the link to the recipe for Butterbeer.  Its super easy and oh so delicious.  I made this over the weekend and found that I actually only needed to whip the topping for 1 minute before it was nice a fluffy.  Also when I was at Kroger they were out of regular A&W cream soda so I had to get diet...NOT THE SAME...it tasted very watery and not rich and delicious like I remembered so I had my husband stop and get some IBC cream soda (you know the delicious kind in the glass bottles) and man oh man it made a BIG difference.  So yes folks, sometimes it is better to get the name brand and not diet...just sayin'

So this picture you can see my amazing butterbeer with the whipped topping a little too whipped and my next recipe I want to share with you comes from Bake at 350 , another great blog that I love at follow daily for great sweet recipes.  This one is for the cookies, the BUTTERBEER COOKIES!!!  I made these for the neighbors for Christmas and they were by far the favorite, my husband loves them and I cant stop eating them.  I think the best part of these cookies is that the cookie itself isnt sweet, so when you put the glaze on the top it isnt so sweet you can only eat one (well i guess maybe that the bad part because I eat way too many!)  Ok on to the Butterbeer cookies .  I love this recipe because they are super easy to make and you dont have to chill them.  I hate when you have to chill the dough, I want the cookies NOW...ok so I am a little impatient but its so rare that I actually make homemade cookies that I dont like to wait.

See the pretty butterscotch glaze, its so tasty!  I ate these babies while watching Harry Potter and the Prizoner of Azkaban, good movie good eats good night!  So what are you waiting for go make these bad boys!!  PS---I tried to find some Harry Potter cookie cutters and found none that were worthy.  If you know where I can get some awesome Harry Potter cookie cutter, let me a comment so I can go buy some!

Not even a crumb left it was THAT good.  So go check out Bakingdom and Bake at 350 , leave them some love and let them know Project Housewife sent you.  These ladies are seriously talented and you will love what they have on their blog. 

Project Housewife Out!